Creating one Liferay site by hand is easy. Creating 20, 50, or 100 sites with the same navigation, structures, fragments, and permissions is a different problem entirely – manual setup doesn’t scale, and small inconsistencies between environments quietly turn into production bugs.
Liferay Site Initializer solves this by packaging a site’s pages, content, and configuration as a deployable client extension that can recreate — or, with update support enabled, update – the same site anywhere. This guide covers the practical mechanics: real project structure (pulled from a production Inexture Site Initializer module), replacement tokens, CI/CD, update behavior, and the mistakes that most often break a deployment.
Quick guide: implementers should focus on the walkthrough, replacement-token, and mistakes sections below. Decision-makers can jump straight to “Why Automate,” the comparison table, and “When to Use It.”
Why Automate Multi-Site Provisioning?
Organizations running several similar sites – regional, departmental, or partner-facing — usually share a header, navigation, page templates, and baseline content across all of them. Without automation, three problems show up quickly:
- Provisioning takes hours per site, and that cost repeats for every new site.
- Configuration drift: Site A and Site B quietly diverge because setup is manual.
- Tribal knowledge: if the person who built a site leaves, no one can reproduce exactly how it was configured.
Site Initializer fixes this by making the desired configuration part of the codebase — version-controlled, reviewable, and repeatable.
Site Initializer vs. the Alternatives
| Approach | Repeatability | Version Control | CI/CD Friendly | Best For |
|---|---|---|---|---|
| Manual Site Creation | Low | No | No | One-off sites |
| Site Templates | Medium | Limited | Limited | Reusable structures |
| LAR Import/Export | Medium | Limited | Possible | Migration |
| Headless Site APIs | High | Yes | Yes | Dynamic, runtime provisioning |
| Site Initializer | High | Yes | Yes | Standardized, repeatable provisioning |
One version note worth flagging: Liferay’s current documentation states Site Template propagation is no longer supported as of DXP 2026.Q1 — worth checking before betting an architecture on that approach for a new build.
Building a Site Initializer: A Real Walkthrough
Rather than a hypothetical example, this section is pulled from a production Site Initializer module (“Inexture”) — a bundle-style module using the older BundleSiteInitializer approach (bnd.bnd + Provide-Capability), which is the pattern most existing production initializers still use. Liferay’s newer client-extension.yaml approach (DXP 2023.Q4+ / Portal GA100+) is functionally similar but packaged differently — check which your target version documents before choosing.
1. Module Descriptor (bnd.bnd)
The bnd.bnd file is what tells Liferay this module is a Site Initializer and what name to show in the site-creation template picker:
Bundle-Name: Inexture Site Initializer
Bundle-SymbolicName: com.inexture.site.initializer
Bundle-Version: 1.0.0
Liferay-Site-Initializer-Name: Inexture
Provide-Capability: liferay.site.initializer
Web-ContextPath: /inexture-site-initializerAnd the accompanying build.gradle is minimal — just a compile-only dependency on the portal API:
dependencies {
compileOnly group: "com.liferay.portal", name: "release.dxp.api"
}
2. Roles and Custom Fields
[
{ "name": "Internal User", "scope": 1, "type": 1 },
{ "name": "External User", "scope": 1, "type": 1 },
{ "name": "Forum Moderator", "scope": 1, "type": 1 }
]
Custom fields (expando columns) work the same way. This project uses them to store Microsoft 365 profile data synced onto each Liferay user — a good example of a Site Initializer provisioning fields that a separate integration then populates at runtime:
[
{ "dataType": 15, "modelResource": "...model.User",
"name": "microsoftDepartment" },
{ "dataType": 15, "modelResource": "...model.User",
"name": "microsoftJobTitle" },
{ "dataType": 15, "modelResource": "...model.User",
"name": "microsoftUserId" }
]
3. Fragments
A fragment collection is just a name (collection.json) plus one folder per fragment:
{ "name": "Inexture Fragments" }
Each fragment folder needs a fragment.json pointing at its HTML/CSS/JS files:
{
"configurationPath": "index.json",
"cssPath": "index.css",
"htmlPath": "index.html",
"jsPath": "index.js",
"name": "Inexture Header",
"type": "component"
}
The HTML can use full Freemarker logic — this header fragment checks sign-in state before rendering the search bar:
[#assign isSignedIn = (themeDisplay?? &&
themeDisplay.isSignedIn()) /]
...
4. Pages
A page’s metadata (page.json) is compact – name, friendly URL, and page-level permissions:
{
"friendlyURL": "/app",
"name": "App",
"type": "Content",
"hidden": false,
"private": false,
"permissions": [
{ "actionIds": [], "roleName": "Guest", "scope": 4 }
]
}
The page’s actual content layout lives in a separate page-definition.json, generated using the export/clean/re-import cycle described below rather than written by hand.
Deploying and Automating Deployment
For local development, deploy through a Liferay Workspace:
../../gradlew clean deploy \
-Ddeploy.docker.container.id=$(docker ps -lq)
For CI/CD, treat provisioning as a normal deployment stage rather than a manual step:
stages:
- validate
- build
- deploy-dev
- deploy-stage
- deploy-prod
The architectural point matters more than the exact YAML: site provisioning becomes part of the deployment lifecycle, not a manual administrative task performed after the fact.
Update Support and Idempotency
Before wiring this into CI/CD, it’s worth being precise about how “create or update” behaves, since that determines whether re-running a deployment is safe.
Historically, Site Initializers had no update support at all — changing the initializer’s code had no effect on an already-created site; the only way to apply changes was to delete and recreate the site. That’s still the default assumption unless update support is explicitly enabled.
Update support was added later, but it ships behind a feature flag rather than being on by default (toggle it via a portal property, an environment variable, or Instance Settings → Feature Flags, depending on version). Once enabled, a created site is linked back to its initializer, and further code changes can be pushed live via a Synchronize action instead of a full site recreation.
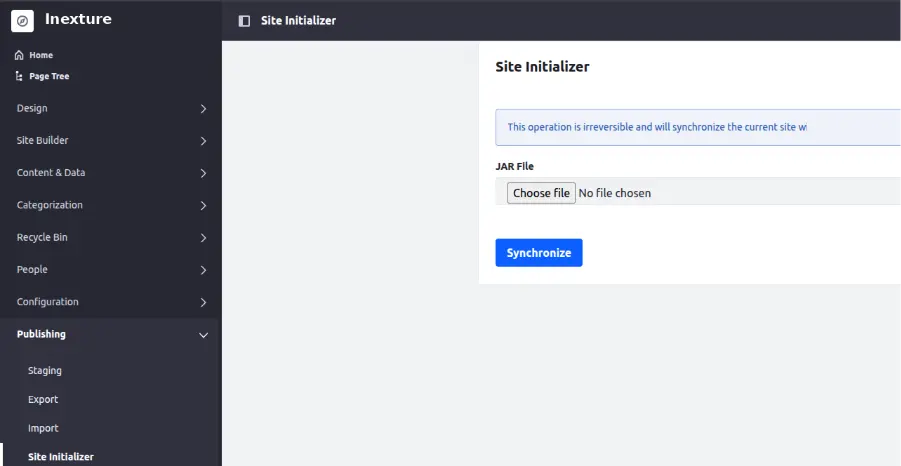
The Site Initializer panel under Publishing, showing the Synchronize action.
One detail worth knowing: this panel includes a JAR File upload field, but you don’t need to select one to run a sync. Leaving it empty just applies whatever version of the module is already deployed — the upload field is only for pushing a new JAR at the same time.
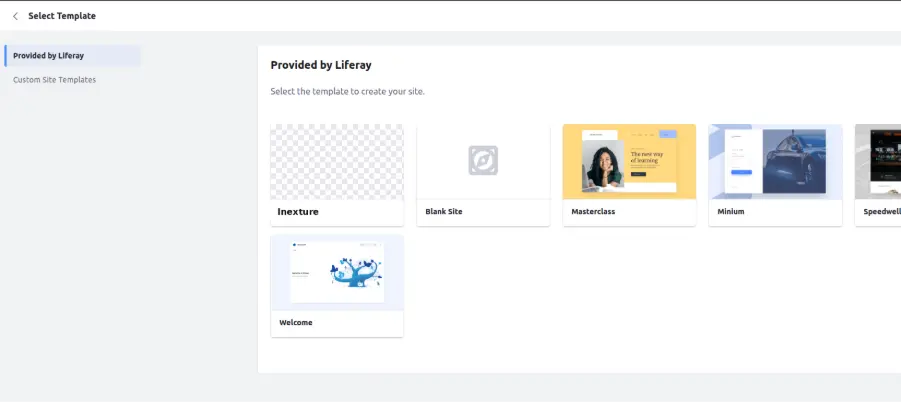
Once deployed, a Site Initializer (here, “Inexture”) shows up as a selectable template next to Liferay’s own examples.
Practical takeaway for CI/CD: verify whether update support is enabled in each target environment before scripting automatic redeploys, keep “create” and “sync” as distinct pipeline steps, and avoid running an automated sync against any site where users have already made manual edits — that’s the scenario this tooling is least suited for.
Making It Portable: External Reference Codes and Tokens
The single most important practice for a reusable Site Initializer is avoiding hard-coded, environment-specific IDs. This breaks between environments:
{ "groupId": "12345" }
This resolves at deployment time instead:
{ "groupId": "[$GROUP_ID$]" }
Liferay also supports asset-based tokens for referencing another asset that doesn’t have a predictable ID, e.g. [$OBJECT_DEFINITION_ID:ObjectDefinition1$]. When generating this data from an existing site, always strip database IDs, timestamps, and creator/user references from exported JSON before committing it – Liferay’s own guidance is explicit that raw exports are not portable as-is.
Common Mistakes
1. Hard-coding database IDs
The single easiest way to make an initializer fail when moving between environments. Use replacement tokens instead.
2. Copying exported JSON without cleaning it
Exported data carries IDs, timestamps, and user references valid only in the source environment. Always review before committing.
3. Assuming content references resolve automatically
One reported real-world case: a content page embedding a Web Content Article can break because the article’s ID and the group ID are regenerated on each site creation, so a page pointing at hard-coded values reports the content as missing even though it still exists. Leaving those ID fields unset lets Liferay resolve them dynamically instead.
4. Deploying straight to production
Validate on a clean instance, then staging, before production — and don’t run an update sync against a site that already has manually-added content.
This resolves at deployment time instead:
Best Practices
- Keep initializers small and focused rather than one giant bundle of every asset.
- Use meaningful External Reference Codes (inexture-home-page, not abc123).
- Treat the initializer as the source of truth — don’t make undocumented changes directly in an environment.
- Test on a clean Liferay instance; a site that only works because another site already exists isn’t actually portable.
- Confirm asset dependency ordering — if Asset A references Asset B, make sure B resolves during deployment.
This resolves at deployment time instead:
When Should You Use Site Initializer?
Use it when you repeatedly create similar sites, want version-controlled configuration, and want provisioning integrated into CI/CD. Prefer the Headless Site APIs instead when provisioning needs to happen dynamically at runtime from user input rather than from a known, predefined blueprint.
Conclusion
Multi-site Liferay implementations get hard to maintain the moment every new site requires a long manual setup sequence. Site Initializer changes that by treating provisioning as a deployable engineering artifact – defined, versioned, validated, deployed, and verified like any other code change. The benefit isn’t just faster site creation; it’s consistency and repeatability across every environment and every site.
If you’re evaluating this for your own multi-site setup, a good next step is a small proof of concept: build one initializer for a single non-critical site, confirm your Liferay version’s update-support behavior, and use that to scope a shared-baseline architecture before committing further sites to it.
FAQs
Can Site Initializer create multiple sites?
Yes – the same initializer, or a shared baseline plus regional initializers, can standardize many sites. For sites with major differences, separate initializers give clearer ownership.
Can I use database IDs inside a Site Initializer?
You should avoid it. Use replacement tokens and asset-based references, so values resolve correctly at deployment time in any environment.
Should I use Site Initializer instead of LAR?
Not necessarily — use LAR for data migration/transfer, and Site Initializer for a repeatable, deployable site blueprint that fits into a development workflow.
Does update support work the same on every version?
No – confirm the feature-flag status (LPS-165482 and later refinements) on your specific Liferay version before relying on it for automated re-syncs.