Modern enterprise portals rarely operate in isolation. A Liferay DXP implementation may manage content, workflows, customer requests, employee processes, approvals, or business data, while Microsoft Teams remains the primary collaboration platform for internal communication.
Connecting the two removes a surprising amount of manual work – but only if the authentication is set up correctly. Most integration write-ups skip straight to “here’s how you call the Teams API” and leave out the part that actually determines whether the integration works: how Liferay and Microsoft Entra ID agree to trust each other, and how the resulting token makes its way from a user’s login into an actual Graph API call.
This guide fills that gap. It walks through the full path end to end — registering the application in Microsoft Entra ID, wiring it into Liferay’s OpenID Connect SSO, and then following the token itself through the code to see exactly how it gets from a signed-in user’s session into a Microsoft Graph request. By the end, you’ll have Liferay DXP authenticating users against Entra ID, pulling their Graph access token out of that login session, and using it to call Microsoft Teams, Calendar, and SharePoint APIs.
What you're building
Three pieces work together:
- Microsoft Entra ID (Azure AD) – where the application is registered and where Microsoft actually authenticates the user and issues tokens.
- Liferay DXP’s OpenID Connect SSO – the client that runs the login flow against Entra ID and stores the resulting token in the user’s session.
- An OSGi module (adc-teams-graph-service) – which retrieves that token from the Liferay session and uses it to call Microsoft Graph on the user’s behalf.
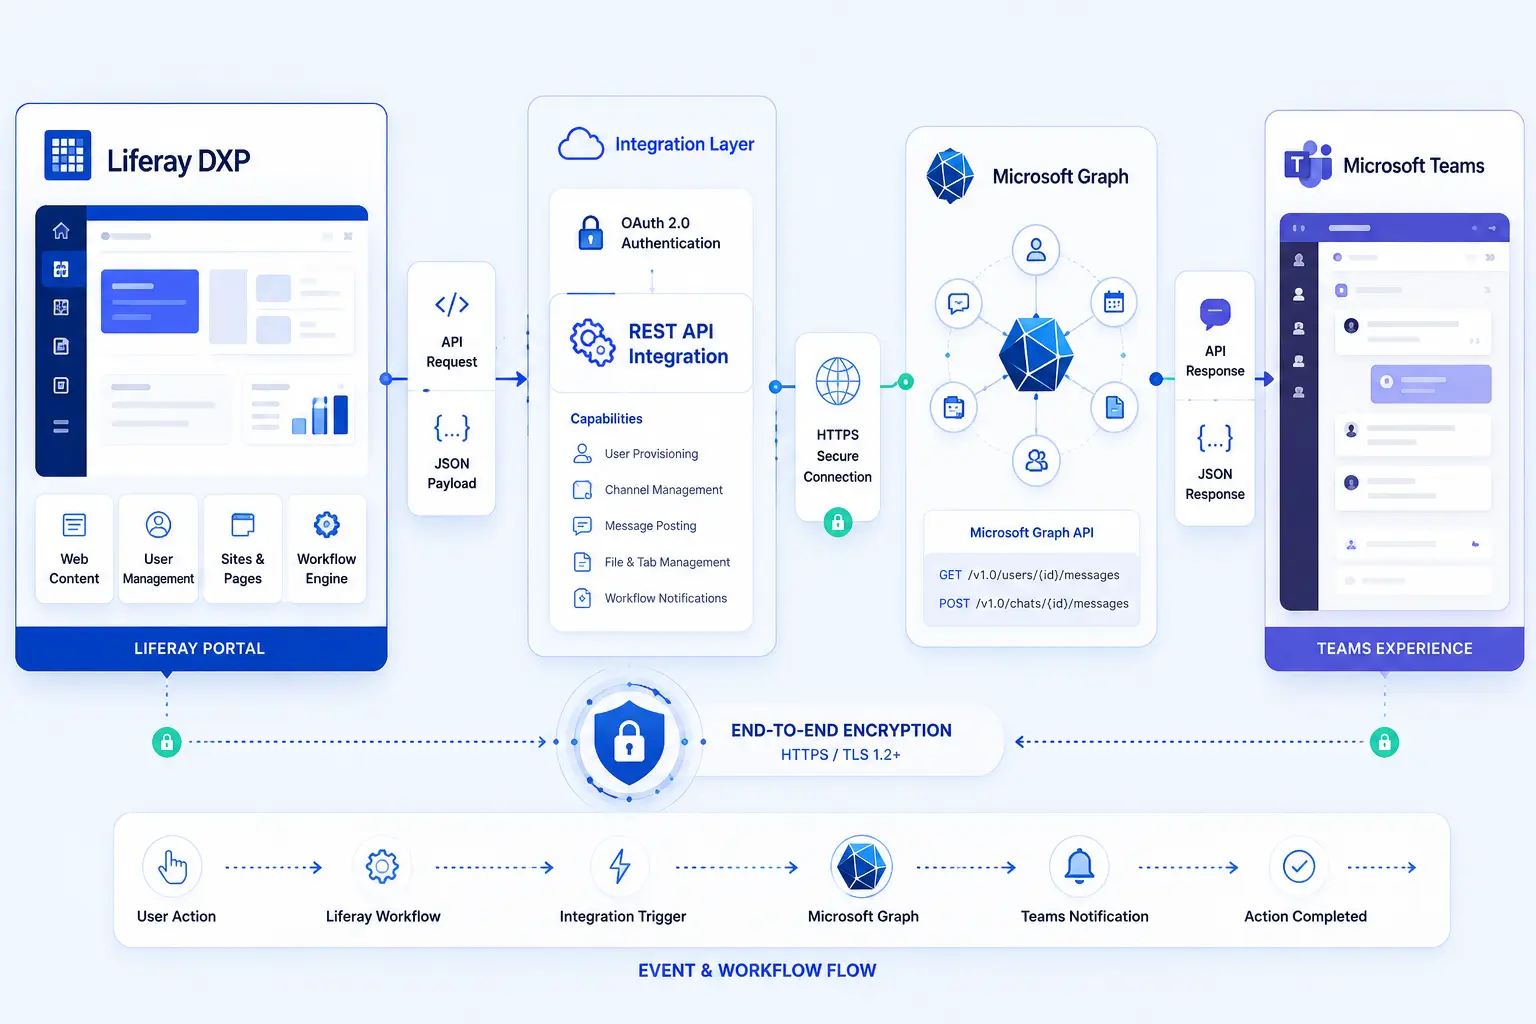
The end-to-end path is:
User logs in through Liferay → Liferay redirects to Microsoft → Microsoft authenticates and redirects back with a token → Liferay stores the token in the session →
The module reads the token and calls Microsoft Graph
Prerequisites
- An Azure subscription with permission to register applications in Microsoft Entra ID.
- A Liferay DXP instance with Instance Settings access to configure SSO.
- The exact host and port your Liferay instance runs on, since it determines the redirect URI.
Part 1 - Register the application in Microsoft Entra ID
Step 1: Register an Application
In the Azure Portal, go to Microsoft Entra ID → App registrations → New registration.
- Give it a clear name, for example, Liferay-OIDC.
- Under Supported account types, choose
Single tenant – Accounts in this organizational directory only,
unless you specifically need a multi-tenant application. - Under Redirect URI, choose the platform type
Web and enter Liferay’s OpenID Connect callback path:http://{your-host}:{port}/c/portal/login/openidconnect
For example, in a local development environment:http://localhost:8080/c/portal/login/openidconnect - Click Register.
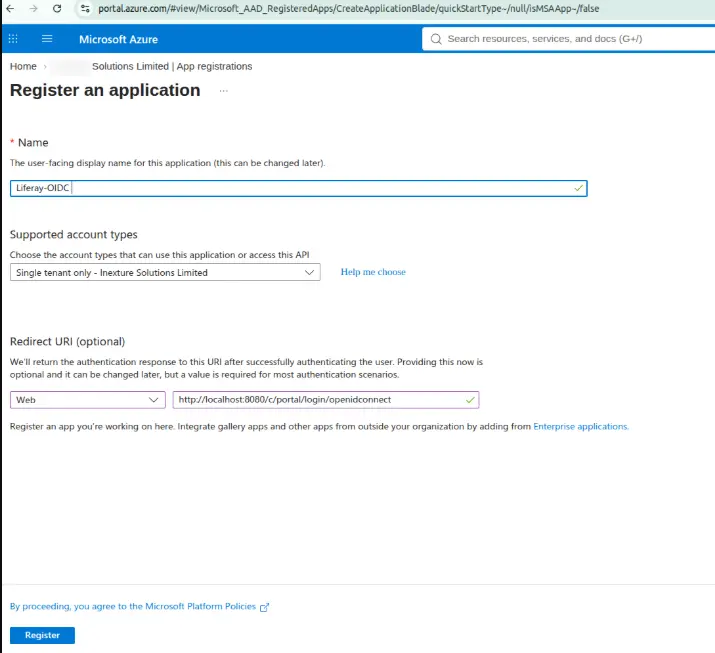
Why this matters: This redirect URI is where Microsoft sends the user back after they sign in. If it doesn’t match exactly what you configure in Liferay later, the login will fail with a redirect_uri_mismatch error – this is the single most common setup mistake.
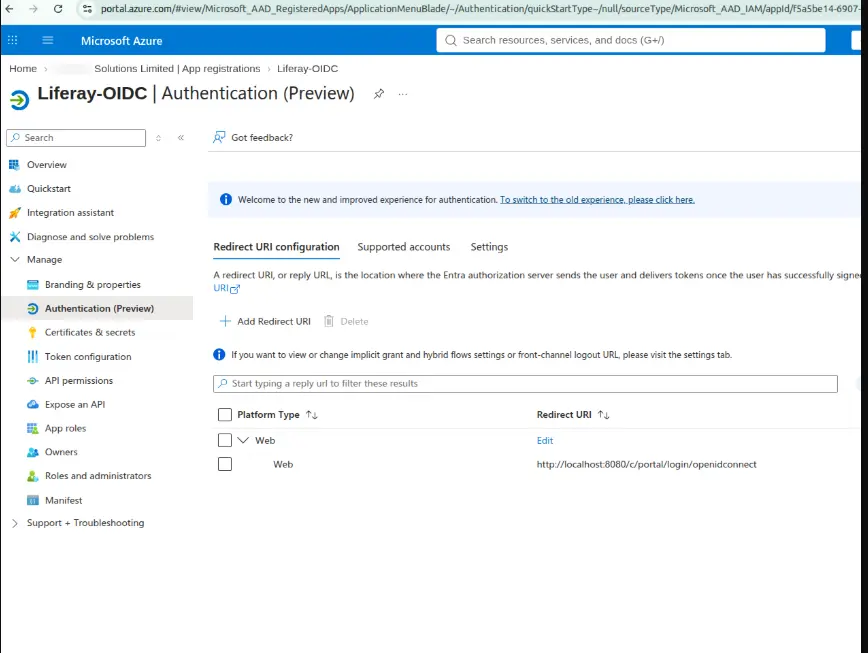
Step 2: Note the Application’s Identifiers
On the app’s Overview page, record three values you’ll need later:
- Application (client) ID – identifies this app registration to Microsoft.
- Directory (tenant) ID – identifies your organization’s Microsoft Entra ID tenant.
- Object ID – the app registration’s internal identifier. It is rarely needed directly, but it is good to have.
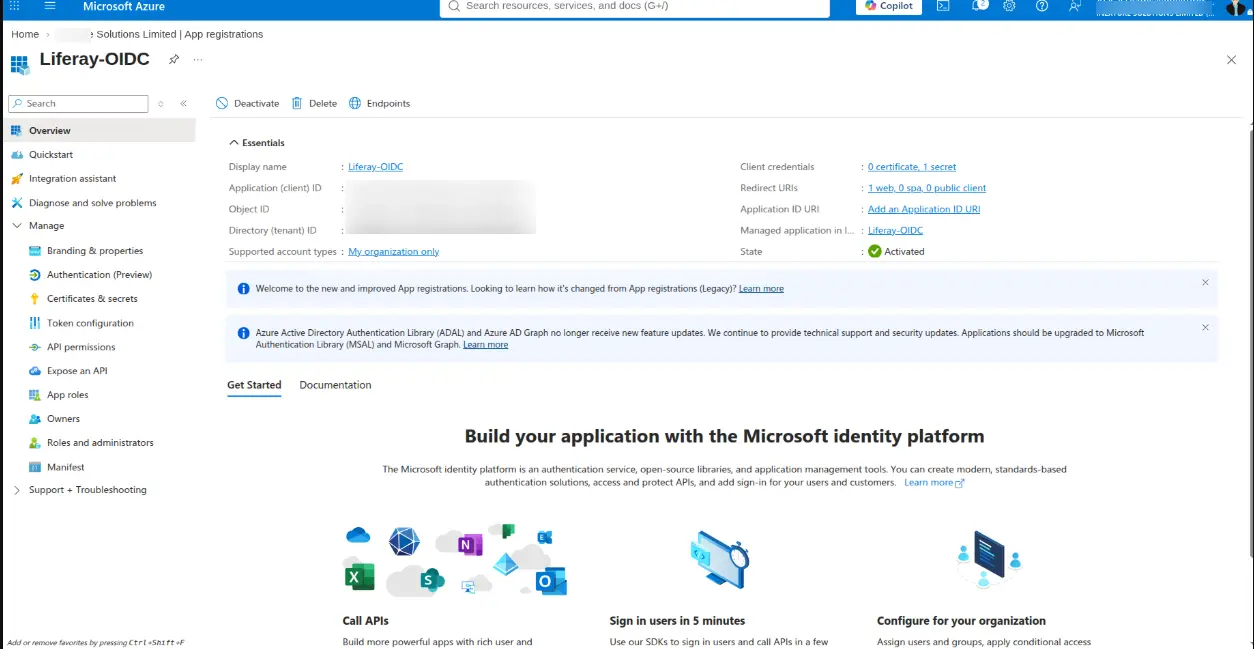
Step 3: Configure API permissions
Go to API permissions → Add a permission → Microsoft Graph, and add only the scopes your integration actually uses. For a Teams + Calendar + Chat integration like this one, that typically means a mix of delegated permissions (act as the signed-in user) and, for background/webhook scenarios, a smaller set of application permissions:
- Delegated: ChannelMessage.Send, ChannelMessage.Read.All, ChannelMember.Read.All, Calendars.Read / Calendars.ReadWrite, Directory.Read.All
- Application (only if you have a background/service scenario that runs without a signed-in user): ChannelMessage.Read.All, ChannelMember.ReadWrite.All, Chat.Read.All
After adding permissions, click Grant admin consent for your organization. Some scopes (like ChannelMessage.Send) don’t require admin consent at all; others are marked Yes and will show a red/unconsented status until an admin approves them – don’t skip this, since Graph will reject the call with a 403 until consent is granted.
Practical tip: Add permissions incrementally as you build each feature, rather than requesting everything up front. It keeps the consent screen honest and makes it obvious which permission maps to which capability if something breaks later.
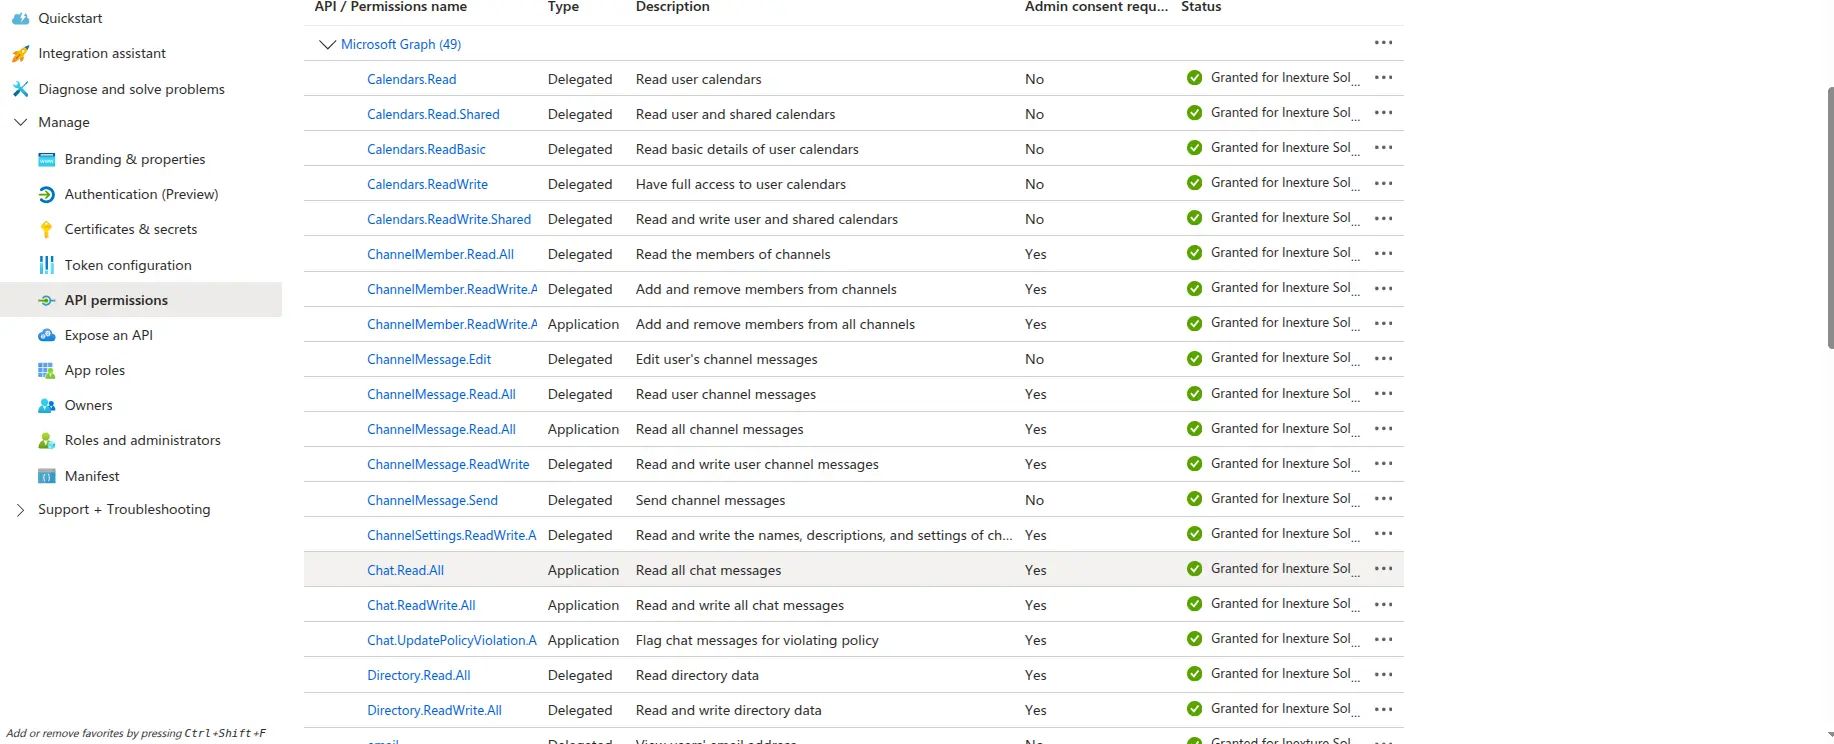
Step 4: Create a client secret
Go to Certificates & secrets → Client secrets → New client secret.
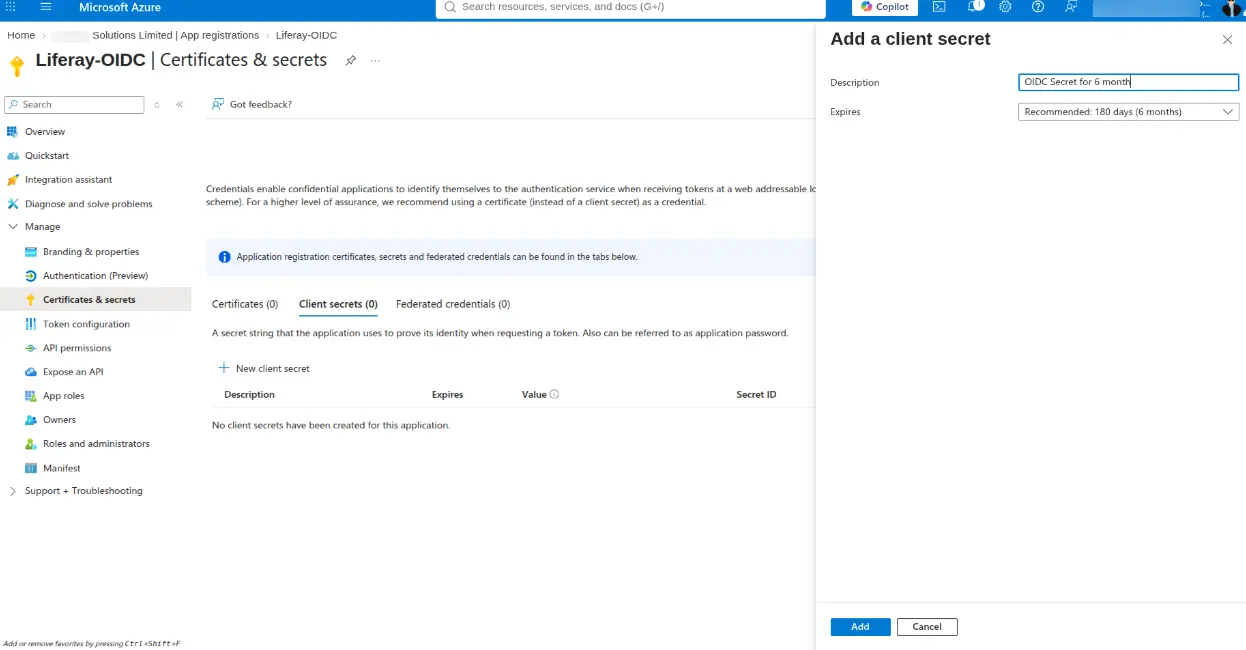
5. Give it a description that includes its purpose and rough lifetime, e.g. “OIDC Secret for 6 months”.
6. Choose an expiry (Microsoft recommends 180 days; some organizations use longer-lived secrets or move to certificate-based credentials for production).
7. Click Add, then immediately copy the Value shown – this is the only time the full value is displayed. If you navigate away without copying it, you’ll have to create a new secret.
Step 5: Copy the endpoints you’ll need
Back on the app’s Overview page, click Endpoints. You need two values from this list for the Liferay side:
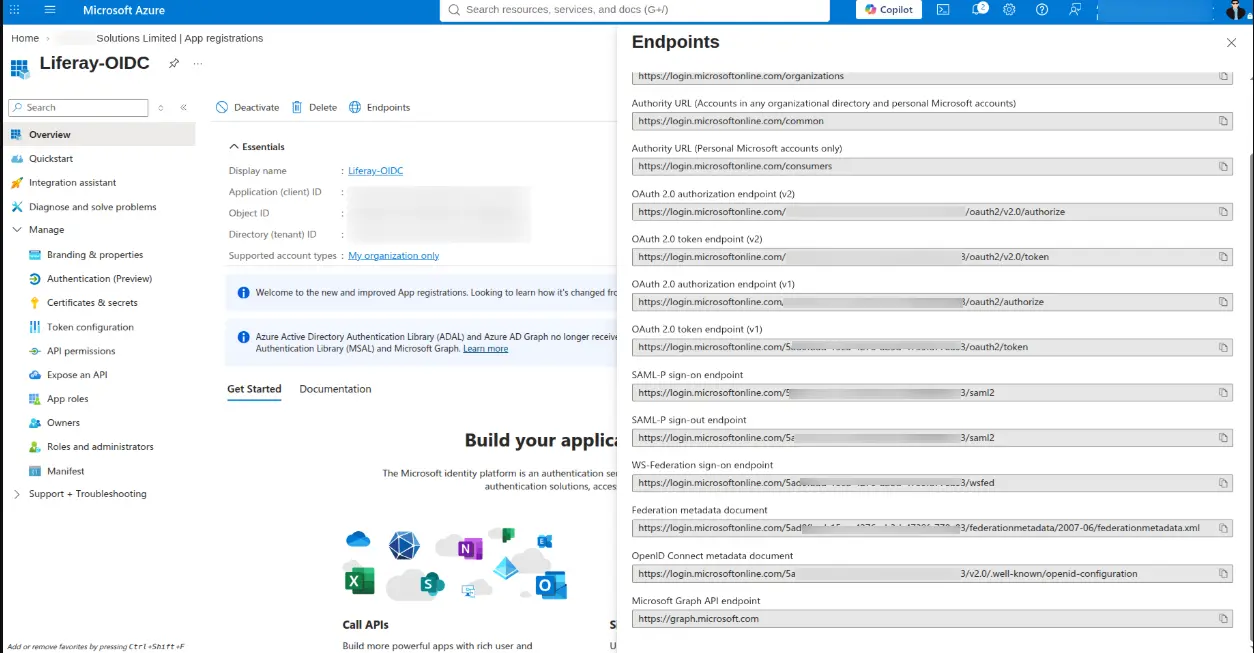
- OpenID Connect metadata document – https://login.microsoftonline.com/{tenant-id}/v2.0/.well-known/openid-configuration – this single URL is enough for Liferay to auto-discover the authorization, token, and JWKS endpoints.
- Microsoft Graph API endpoint – https://graph.microsoft.com – the base URL the module will target for every Graph call.
Part 2 - Configure OpenID Connect SSO in Liferay
Step 6: Enable OpenID Connect
In Liferay, go to Instance Settings → SSO → OpenID Connect, check Enabled, and Save. This just turns the SSO method on at the instance level; the actual provider details are configured separately.
Step 7: Create the OIDC provider connection
Go to OpenID Connect Provider Connection and fill in:
- Provider Name – a descriptive label, e.g. “Azure OIDC”.
- Scopes – openid email profile offline_access. The offline_access scope is what causes Microsoft to also issue a refresh token, not just an access token – without it, the session’s access token can’t be renewed and the user would need to log in again as soon as it expires.
- Discovery Endpoint – the OpenID Connect metadata document URL from Step 5.
- Discovery Endpoint Cache in Milliseconds – how long Liferay caches the metadata it fetches from that URL before re-checking it (a few minutes is reasonable, don’t set this so high that a key rotation on Microsoft’s side goes unnoticed for days).
- OpenID Connect Client ID and OpenID Connect Client Secret – the Application (client) ID and the client secret value from Steps 2 and 4.
Leave Authorization Endpoint, Issuer URL, and JWKS URI blank – Liferay resolves all three automatically from the discovery document once it’s set, so hardcoding them is unnecessary and just adds a place for a stale value to cause a mismatch later.
Why the same credentials matter twice: The Azure client ID/secret you enter here doesn’t just power the user login. The integration module later reads this exact same Liferay OIDC configuration entry (by provider name) to build its own Graph client for application-only calls – so this one place is the single source of truth for both the login flow and the service-level Graph access.
Step 8: Save and test the login
Save the provider connection, then test by logging out and back in through the Microsoft OIDC option. You should be redirected to Microsoft’s sign-in page, prompted to consent (the first time) to the scopes you configured, and redirected back to the redirect URI from Step 1 as a signed-in Liferay user.
Part 3 - What actually happens during login
Underneath the UI, this is a standard OAuth 2.0 authorization code flow:
- Liferay redirects the browser to Microsoft’s authorization endpoint with the configured client ID and scopes.
- The user authenticates with Microsoft and consents to the requested scopes (only on first login, or when scopes change).
- Microsoft redirects back to the registered redirect URI with a short-lived authorization code.
- Liferay exchanges that code at Microsoft’s token endpoint for an ID token, an access token, and – because offline_access was requested – a refresh token.
- Liferay stores these against an OpenIdConnectSession record tied to the user’s Liferay session, along with the access token’s expiration time.
From this point on, any server-side code running for that user’s session can ask Liferay for that stored token instead of re-running the login flow.
Part 4 - How the module actually gets the token to call Graph
This is the part that’s easy to gloss over in most integration write-ups, so here’s exactly what the code does, step by step.
Reading the Token Out of the Liferay Session
Microsoft Graph SDK Dependencies
Add the Microsoft Graph SDK and Azure authentication dependencies to your module’s build.gradle file:
dependencies {
compileOnly group: "com.liferay.portal", name: "release.dxp.api"
compileOnly group: "jakarta.websocket", name: "jakarta.websocket-api", version: "2.0.0"
// Graph SDK and auth libs only in this module
compileInclude "com.microsoft.graph:microsoft-graph:6.59.0"
compileInclude("com.azure:azure-identity:1.18.1") {
exclude group: "com.azure", module: "azure-core-http-netty"
exclude group: "io.netty"
}
compileInclude "com.azure:azure-core-http-okhttp:1.11.17"
compileInclude "com.azure:azure-core:1.57.0"
compileInclude "org.jetbrains.kotlin:kotlin-stdlib:1.9.20"
compileInclude "com.squareup.okhttp3:okhttp:4.12.0"
testImplementation group: "org.junit.jupiter", name: "junit-jupiter-api", version: "5.10.2"
testRuntimeOnly group: "org.junit.jupiter", name: "junit-jupiter-engine", version: "5.10.2"
testImplementation group: "org.mockito", name: "mockito-core", version: "5.11.0"
testImplementation group: "org.mockito", name: "mockito-junit-jupiter", version: "5.11.0"
testImplementation group: "com.liferay.portal", name: "release.dxp.api"
testImplementation group: "jakarta.websocket", name: "jakarta.websocket-api", version: "2.0.0"
testImplementation group: "com.microsoft.graph", name: "microsoft-graph", version: "6.59.0"
testImplementation group: "com.azure", name: "azure-identity", version: "1.18.1"
testImplementation group: "com.azure", name: "azure-core", version: "1.57.0"
testImplementation group: "com.azure", name: "azure-core-http-okhttp", version: "1.11.17"
testImplementation group: "com.squareup.okhttp3", name: "okhttp", version: "4.12.0"
testImplementation group: "org.glassfish.jersey.core", name: "jersey-common", version: "3.0.4"
testImplementation group: "io.projectreactor", name: "reactor-test", version: "3.6.4"
}
test {
useJUnitPlatform()
jvmArgs += [
"--add-opens=java.base/java.lang=ALL-UNNAMED",
"--add-opens=java.base/java.lang.reflect=ALL-UNNAMED",
"--add-opens=java.base/java.util=ALL-UNNAMED",
"--add-opens=java.base/java.lang.invoke=ALL-UNNAMED",
"--add-opens=java.base/java.net=ALL-UNNAMED",
"--add-opens=java.base/java.text=ALL-UNNAMED"
]
}
The getValidAccessToken() method is the single place this happens. You need to create this method in MicrosoftOidcAuthService.java:
public String getValidAccessToken() throws Exception {
OpenIdConnectSession session =
openIdConnectSessionLocalService.fetchCurrentOpenIdConnectSession();
if (session == null) {
throw new Exception(
"No active OpenIdConnectSession found. Please login via Microsoft OIDC SSO.");
}
String accessToken = session.getAccessToken();
Date expirationDate = session.getAccessTokenExpirationDate();
// Liferay sometimes stores the raw token endpoint JSON response
// instead of just the access_token string — unwrap it if so.
if (accessToken != null && accessToken.trim().startsWith("{")) {
JSONObject json = JSONFactoryUtil.createJSONObject(accessToken);
if (json.has("access_token")) {
accessToken = json.getString("access_token");
}
}
boolean isExpired = expirationDate == null
|| (expirationDate.getTime() - 60000) < System.currentTimeMillis();
if (isExpired) {
throw new Exception(
"Token expired or missing. Please login via Microsoft OIDC SSO.");
}
return accessToken;
}
Three practical details worth calling out:
- It reads from Liferay’s own
OpenIdConnectSessionLocalService– there’s no separate token store the module manages itself. - It defensively unwraps the token, because depending on configuration Liferay can persist either the bare
access_tokenstring or the entire token endpoint response as JSON. - It treats a token expiring within the next 60 seconds as already expired, and fails fast with a clear error rather than sending a request that Graph would reject anyway.
For calls that need a token scoped to a different resource (SharePoint, for example, which uses a different audience than the default Graph scope), getValidAccessToken(resource) first tries an On-Behalf-Of token exchange using the current user’s token, falling back to a client-credentials request if that isn’t available.
Adapting it into the Microsoft Graph SDK’s Credential Contract
The Microsoft Graph Java SDK expects a TokenCredential, not a raw string. You need to create the TokenCredential adapter in CurrentUserTokenCredential.java:
@Override
public Mono getToken(TokenRequestContext request) {
try {
String token = authService.getValidAccessToken();
return Mono.just(
new AccessToken(
token,
OffsetDateTime.now().plusHours(1)
)
);
} catch (Exception e) {
return Mono.error(e);
}
}
Create this getToken() implementation in CurrentUserTokenCredential.java as part of your TokenCredential adapter.
Every time the SDK needs a token for a request, it calls getToken() — which, under this adapter, just re-reads whatever is currently valid in the Liferay session. There’s no separate caching layer here because getValidAccessToken() already does the expiry check against Liferay’s stored value.
Building the Actual Graph Client
The Graph client factory method is what your Teams and message services call. You need to create this method in GraphClientFactory.java.
For delegated (user) access:
private GraphServiceClient buildClient(String baseUrl) {
TokenCredential cred = /* your TokenCredential implementation */;
String[] scopes = {
"https://graph.microsoft.com/.default"
};
GraphServiceClient client =
new GraphServiceClient(cred, scopes);
client.getRequestAdapter().setBaseUrl(baseUrl);
return client;
}
For application-only access (used for background/webhook scenarios with no signed-in user), create the client-credentials setup in GraphClientFactory.java. It reads the client ID, client secret, and discovery endpoint directly from the same Liferay OIDC configuration entry you created in Step 7:
ClientSecretCredential cred =
new ClientSecretCredentialBuilder()
.tenantId(tenantId) // extracted from the discovery endpoint URL
.clientId(clientId) // same value as Liferay's OpenID Connect Client ID
.clientSecret(clientSecret) // same value as Liferay's OpenID Connect Client Secret
.build();
Create this client-credentials setup in GraphClientFactory.java.
This is why Step 7 mattered twice: the exact same Azure app registration and secret drive both the interactive login and the service-level Graph access – there’s deliberately no second app registration or separate secret to keep in sync.
Part 5 - Calling a Graph API end to end
With the client built, calling Graph is a normal SDK call. For example, posting a message to a Teams channel on behalf of the signed-in user:
ChatMessage message = new ChatMessage();
ItemBody body = new ItemBody();
body.setContent(
"A new request has been submitted in Liferay DXP."
);
message.setBody(body);
graphClient
.teams(teamId)
.channels(channelId)
.messages()
.post(message);
Create this Teams message call in TeamsGraphService.java.
Internally, that call triggers the TokenCredential adapter’s getToken() implementation, which triggers getValidAccessToken() and reads straight from the Liferay session established back in Part 3. If the user’s token has expired and they haven’t refreshed their session, the authentication method from Part 4 fails – which is the correct behavior: the caller should catch that and prompt re-authentication rather than silently failing.
Troubleshooting checklist
- Login redirects to Microsoft but fails on the way back — check that the redirect URI in the Azure app registration matches Liferay’s callback path exactly, including scheme, host, and port.
- Graph call returns 403 Forbidden — check whether the specific permission has been granted admin consent; a permission listed under API permissions without consent will still be rejected at call time.
- “No active OpenIdConnectSession found” — the user hasn’t logged in via the OIDC provider (e.g., they logged in with a local Liferay account instead), or their token has expired and offline_access wasn’t requested so it couldn’t silently refresh.
- Stale configuration after rotating a secret in Azure — remember to update the OpenID Connect Client Secret field in Liferay’s provider connection too; Azure and Liferay don’t sync automatically.
- SharePoint or other non-Graph-default calls failing — confirm the resource-specific token path (On-Behalf-Of / client-credentials fallback) has the right permissions for that resource’s audience, not just the default Graph scope.
Conclusion
Register the app in Entra ID with the right redirect URI → grant the Graph permissions the integration actually needs and consent to them → create a client secret → point Liferay’s OIDC provider connection at the discovery endpoint with those same credentials → log in once to establish an OpenIdConnectSession → let the module read that session’s token through MicrosoftOidcAuthService → wrap it as a TokenCredential → hand it to the Graph SDK.
Follow these steps in order and the result is a working, delegated Teams integration with no separate token store or duplicated credentials to keep in sync.